1. Introduction
Virtualbox is a great tool to do some test on PXE boot. There are two ways to build and test the PXE in Virtualbox, one is to set up the DHCP server, TFTP server all by yourself when applying the bridge or host only adapters. Another way is to take advantage of Virtualbox build-in DHCP server and TFTP server.
In order to focus on learning how PXE set up a machine, I choose NAT network to implement PXE test IDBEnvironment.
The whole process can be divided into two parts, the first one is Virtualbox configuration, the second part is netboot files preparation.
2. Virtualbox Configuration
Firstly, follow the virtualbox virtualmachine creation guide to creat a virtual machine.
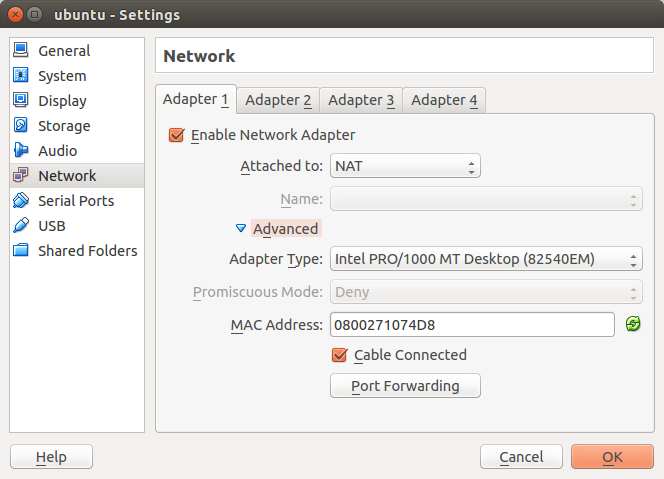
Pay attention to the configurations on Network.

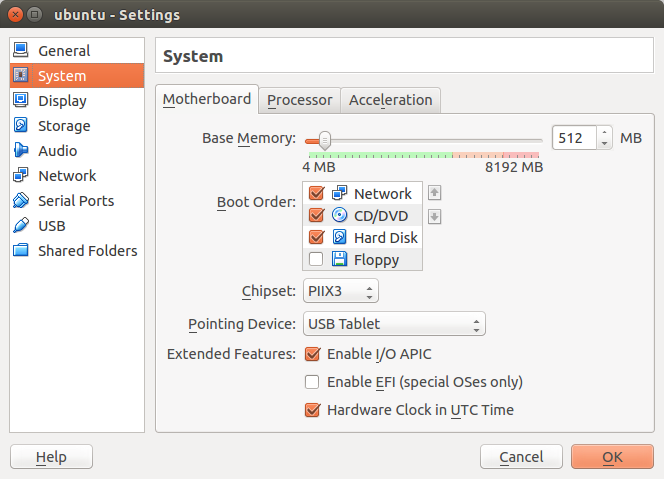
Set the virtual machine boot from the network firstly.

3. TFTP preparation and netboot file
For the Virtualbox, the software’s build-in tftp server will lookup files in
/home/currentuser/.config/VirtualBox
So, create a TFTP folder and put the netboot files in this floder.
I download the ubuntu netboot file from ubuntu
wit command: wget -r -np -nH -R index.html http://archive.ubuntu.com/ubuntu/dists/trusty-updates/main/installer-amd64/current/images/netboot/
to download the whole directory.
Then put the file under the TFTP folder
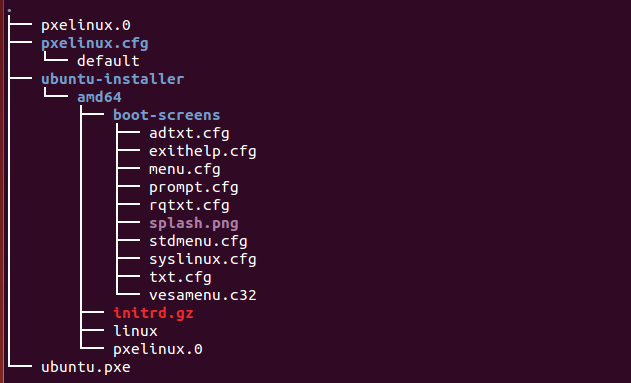
The Structure of TFTP folder is show as:

It is quite important to set the file name as ubuntu.pxe(ubuntu is the name of this virtual machina, and I will tell you why we should set this name)
4. Booting from virtualbox
Start the Virtual machine, and the

#5. How it works
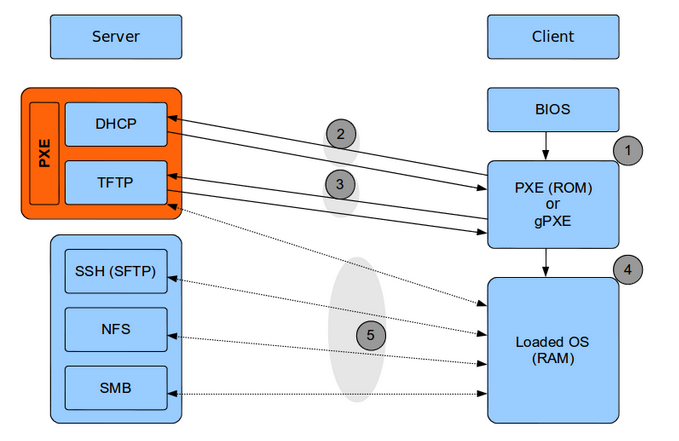
The whole picture is show as below (The picture is from image_site)

##5.1 Booting from PXE When the computer is set to boot from PXE, BIOS will load the PXE firmware code from network card ROM to the memory. Then it hand over the conrol of the system to PXE.
##5.2 Obtain an IP address Then the computer(client) will ask for a IP address, DHCP server response the request and asign an unused IP address to the client The configuration of the DHCP is essential, it will tells the client where to find the tftp server and which file to load. Ususally, the DHCP server is configured as below.
default-lease-time 600;
max-lease-time 7200;
subnet 192.168.10.0 netmask 255.255.255.0 {
range 192.168.10.50 192.168.10.100;
option subnet-mask 255.255.255.0;
option routers 192.168.10.123;
option broadcast-address 192.168.10.255;
filename "ubuntu.pxe";
next-server 192.168.10.123;
                            }
You can find that this configuration point the tftp server is at 192.168.10.123, and the file to load from tftp server is ubuntu.pxe. This is the reason why I should rename the pxelinux.0 to ubuntu.pxe.
##5.3 Booting ubuntu.pex Then the ubuntu.pxe will take control of the computer, according to its default configuration, it will find the boot entry from given path, on my systrem, it will try to load pxelinux.cfg/default.
On pxelinux.cfg/default, it says: include ubuntu-installer/amd64/boot-screens/menu.cfg default ubuntu-installer/amd64/boot-screens/vesamenu.c32 prompt 0 timeout 0
Then you can find the cfg find in the given path. And finally, it will loads the configuration file liek:
label expert                                                                                                                       [0/389]
menu label Expert install
    kernel ubuntu-installer/amd64/linux
    append priority=low vga=788 initrd=ubuntu-installer/amd64/initrd.gz ---
label cli-expert
menu label Command-^line expert install
    kernel ubuntu-installer/amd64/linux
    append tasks=standard pkgsel/language-pack-patterns= pkgsel/install-language-support=false priority=low vga=788 initrd=ubuntu-installe
    Include ubuntu-installer/amd64/boot-screens/rqtxt.cfg
It is clear that the system will load the kernel and initrd file from given path.
##5.4 Booting from OS
Finally the system boots itself from kernel and initrd with passed parameters. In my example, it enters the install mode.
